• the Daily hi thread just say hi :)
  • Welcome to the UK's Most Active Airgun Forum

    Looking for expert advice on air rifles and shooting gear? You have found the internet's premier independent airgun forum. Our active shooting community shares daily technical insights on modular PCP air rifles, spring-powered rifles, air pistols, pellet testing, and optics setup. Whether you are troubleshooting an FX or Daystate regulator, discussing legal FAC requirements, planning a night vision hunting trip, or looking for pest control tips, our members are here to help.

My Westlake B2 journey

Landyman

Member Extraordinaire
Joined
Jul 7, 2022
Messages
2,561
Reaction score
9,437
Points
203
Location
Liskeard Cornwall
So, I've chipped in on a few other people's threads, @Backgardenplinker ,@deleted member and @KILLERPARSNIP have been doing similar threads, but thought I'd add my own to document the fettling of my Westlake B2.

So it started a while back when I asked my local RFD if he had any project guns to get rid of, he usually either scraps them or sells them on to idiots like me, he came out with a double whammy, a B2 and a B3! So, I duly dropped a £20 note into the local air ambulance charity pot and took them home.
So, here's what I'm starting with, A Westlake B2 CUSTOM no less, with the extra deep blueing and top grade hardwood stock (Their blurb, not mine! 🤣)
20241005_184737.webp
As you can see, no expense is being spared in this project with a matching £27 SMK 4x32 scope and a tin of Marksmans finest pellets!

So, internals first, bit short of pictures for this bit, didn't want to keep picking up the camera phone with greasy hands. I'll probably add a few pics at a later date the next time I strip it down to tinker further.
So basically, new leather piston seal, apparently these are better than the synthetic ones when used in an older style B2 (pre SMK). Suitably soaked in ATF fluid overnight, 2 reasons for that, it's cheap and I had some in the garage.

Next, some sort of piston liner. Drinks cans are a usual suspect for this, but not having any at the time I cut down a piece of 4pt plastic milk container, which took up the slack between piston and spring nicely. While the spring was out, give it a good clean, get off the tractor grease it had been previously lubed up with and get it polished up. Both ends and the guide were also given the wet and dry treatment to bring them up to a mirror shine.

Piston next, sticking in the cordless drill, pair of gloves on and get the wet and dry on it, polish until smooth and silky. I find with the soft vice jaws I can clamp the drill horizontally, cable tie around the trigger and use it like a poor man's lathe. Which incidentally is also helpful for polishing the inside of the cylinder after deburring the cocking slot, piece of dowel in the drill, long cut down the middle, insert a piece of wet and dry and use like a flap wheel to polish up the inside of the cylinder.

Right, end of part one before I accidentally press delete and lose the lot!! 😆

More to come!
 
Ok, next bit!
So all the internals are all now nice and clean and shiny, time to put those bits back together, leather piston washer is a bit tight, so piston back in the drill/lathe and give it a sanding back with some 120 grit. Don't make it too tight in the cylinder or it'll rob you of some power, don't forget when the spring throws the piston down the cylinder it will flare out to touch the sides. So I've now got it that when the piston is coated with this stuff it just slides down the cylinder under its own weight.20241009_190552.webp A decent coating of Chambers Moly grease on the spring and guide and 1 power washer between the spring and the guide. I haven't tried to put a slip washer at the bottom of the piston yet as I haven't got one that fits properly. I may try a delrin washer as @Backgardenplinker did.

Moving to the front of the cylinder now and sleeving the transfer port.
The manufacturer of the rifle made the same cylinder for both the .177 and the .22 I believe, and the transfer port is a bit on the large side for the smaller pellet size. I believe decreasing the transfer port size actually makes it more efficient as more of the available air is channelled into the barrel rather than just wasted against the breech face.
I purchased a small piece of brass tube with 4mm external/2mm internal diameters and after cutting to the appropriate length used a 2 part epoxy glue to fix this in place. Measure properly because if it protrudes too far into the cylinder there's a danger the piston will slam into the end if it and shove it up your barrel!!

Ok, breech seal. The fitted seal was knackered, and looking on the bay I found a synthetic seal of very similar dimensions that was being sold to fit a weihrauch model. On purchasing a pair I found they were just a little too big and didn't give a snug lock up on closing the barrel, however I contacted the seller, and returning the originals I had bought, he very kindly made me a pair slightly smaller which fit absolutely perfectly!20231106_170612.webp
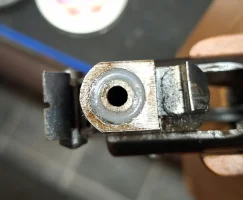
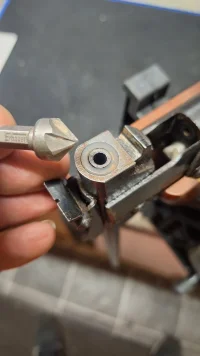
Also whilst at the breech I found that loading a pellet, even short ones like Excite or Marksman, it was quite tricky getting them to seat in the breech properly, so I took a steel countersink bit and gently chamfered the breech very slightly and the pellet fit is much better.
20241009_185506.webp

Right, that'll do for this bit. Next instalment, the barrel! 🤦🏼
 
Last edited:
Top stuff so far. I do like reading these types of thread. (y)
I've got an unused bottle of TWC ultra lube but could never decide what it's actually for. Are you using it as a moly substitute on the piston? Where else is it suitable to use?
 
Top stuff so far. I do like reading these types of thread. (y)
I've got an unused bottle of TWC ultra lube but could never decide what it's actually for. Are you using it as a moly substitute on the piston? Where else is it suitable to use?
I bought a Ultra upgrade kit for my Original 35 and included was this lube and Moly grease. Sooo, the Moly grease goes on the spring. And on the outside of the piston, just on the contact points with the cylinder, a very light smear of Moly and then a few drops of this dripped on the piston and spread around, helps reduce friction greatly.
 
Ok, so next section, the barrel or
'How not to use a 4 inch grinder!'

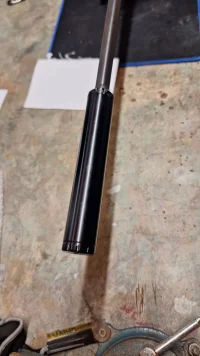
So after getting it all back together time to test it out. I'd already removed the front sight with a hammer and punch, it wasn't obscuring the little scope at all I just felt it was unnecessary. While rooting around in one of my spares boxes I found one of those Amazon solvent trap moderators that I'd made a while back, it had been messed around with to fit a couple of different projects over the years and incredibly with a couple of turns of electrical tape round the barrel it was a pretty good friction fit!
20241009_191557.webp20241009_191604.webp
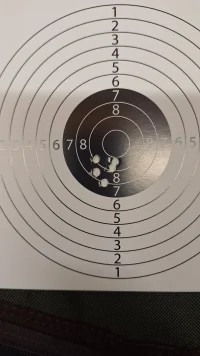
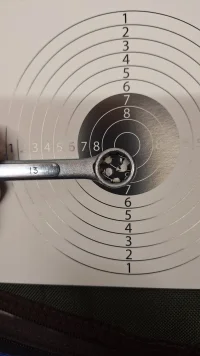
So I duly grabbed my tin of marksman no1 and set up a target at about 12m. I didnt bother rezeroing the scope, i just wanted to see what the grouping was like. Well to say I was impressed was an understatement! Offhand and shooting 5 shot groups, this was probably the best, 13mm edge to edge grouping!
20241009_191420.webp20241009_191418.webp
The action was very nice, no twang, easy cocking and just a satisfying thud when pulling the slightly lighter trigger, and the silencer was helping to quieten down things too!

But, what if I could fit the silencer better? 🤔
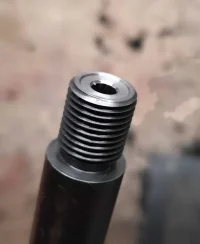
I also have a Weihrauch XL and a BSA silencer spare, so what if I shortened the barrel slightly and fitted a silencer adapter over the end of the barrel to screw on one of these ½inch unf silencers.
Ok, off to ebay, 14.5mm silencer adapter, delivered in a couple of days, ideal!
Right, shortening the barrel. Measure twice, cut once, easy!
Except I hadn't taken into account it was a tapered barrel! 🤦🏼 The silencer adapter wasn't big enough to slide over the end of the cut off barrel, it was about 1mm too small now. Hmm, what's 1mm between friends? Grabbing the 4 inch grinder I thought I'd just grind a little off the barrel all the way round, oh dear, things aren't looking good. I thought I'd just turned my lovely little shooting project into a pile of scrap!
20241017_170545.webp
 
Last edited:
Ok, so next section, the barrel or
'How not to use a 4 inch grinder!'

So after getting it all back together time to test it out. I'd already removed the front sight with a hammer and punch, it wasn't obscuring the little scope at all I just felt it was unnecessary. While rooting around in one of my spares boxes I found one of those Amazon solvent trap moderators that I'd made a while back, it had been messed around with to fit a couple of different projects over the years and incredibly with a couple of turns of electrical tape round the barrel it was a pretty good friction fit!
View attachment 591848View attachment 591849
So I duly grabbed my tin of marksman no1 and set up a target at about 12m. I didnt bother rezeroing the scope, i just wanted to see what the grouping was like. Well to say I was impressed was an understatement! Offhand and shooting 5 shot groups, this was probably the best, 13mm edge to edge grouping!
View attachment 591853View attachment 591852
The action was very nice, no twang, easy cocking and just a satisfying thud when pulling the slightly lighter trigger, and the silencer was helping to quieten down things too!

But, what if I could fit the silencer better? 🤔
I also have a Weihrauch XL and a BSA silencer spare, so what if I shortened the barrel slightly and fitted a silencer adapter over the end of the barrel to screw on one of these ½inch unf silencers.
Ok, off to ebay, 14.5mm silencer adapter, delivered in a couple of days, ideal!
Right, shortening the barrel. Measure twice, cut once, easy!
Except I hadn't taken into account it was a tapered barrel! 🤦🏼 The silencer adapter wasn't big enough to slide over the end of the cut off barrel, it was about 1mm too small now. Hmm, what's 1mm between friends? Grabbing the 4 inch grinder I thought I'd just grind a little off the barrel all the way round, oh dear, things aren't looking good. I thought I'd just turned my lovely little shooting project into a pile of scrap!
View attachment 591865
Use a hacksaw and a file to shorten the barrel.
 
Right been a bit busy the last few days, so time for the barrel update!

After realising that I'd potentially ruined quite a nice shooting little gun that I'd spent a fair bit of my spare time on, I thought I had to do the decent thing and try and bring it back from the brink of going for scrap.

So, a friendly message to our one of our resident tinkers Mr @deleted member and the barrel was wrapped, packed and posted off to his workshop.
Postman collected it from my house on Monday morning, and Tuesday lunchtime I get a message from Hal, "Barrels here, it's in the lathe at the moment give me a ring and let's have a chat about what you want doing".

So having reached the limit of my engineering capabilities I said, 'I'll just go with whatever you can salvage from my disaster!"
Here's a video from the man himself to show what he started with.View attachment 594494
So the decision was to shorten the barrel to remove the Carnage I had created and screw cut the end so that I could fit a moderator. Also as with most of these cheap Chinese guns, the bore wasn't concentric to the barrel. Amazingly Hal was able to pull all sorts of wizardry with his mechanical machines and the result is nothing short of amazing!
View attachment 594498IMG-20241015-WA0007.webpIMG-20241015-WA0014.webp
How he does it is beyond me, and the quality of the work is outstanding, it doesn't matter if it's a Daystate or a cheap £20 chinesium springer he still gives it 100%

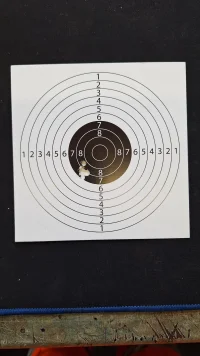
So, disaster averted and I thought I'd chuck my weihrauch mod on and try a few shots to check the grouping, literally bolted the barrel back on and tried 5 shots at 12m across the garden. 9mm group from edge to edge, very happy with that!20241017_171718.webp20241017_171750.webp

Next instalment, how to improve your hardwood stock.
 
Right then, everyone's favourite lesson at school (unless you fancied the sexy female French teacher!😉)

WOODWORK


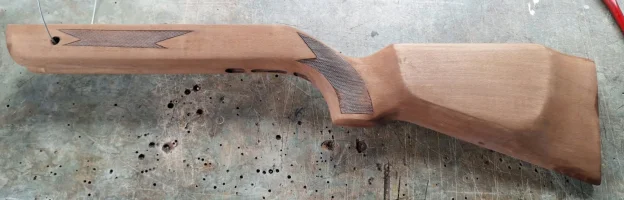
Now we all like a bit of varnished Chinese hardwood, but I thought that while the barrel was away with Hal, I'd have a go at making the stock look a little more alluring.
20241012_111649.webp
I've done a few stocks and things in the past and have lots of odds and ends of stuff in the workshop, so I had a dig through and came up with a few part bottles of finishing products.
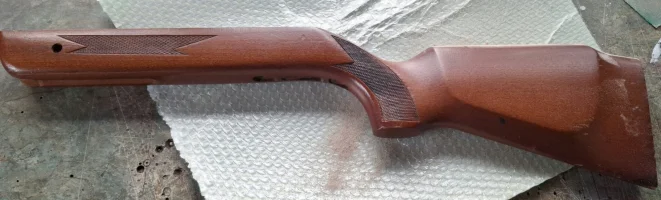
First job, carefully strip off the original dark brown coating, out with the palm sander and gently take the stock back to bare wood. I have to be careful with my sander because it's a bit of an animal and it's quite easy to lose the definition of a stock very quickly! I took care not to go over the factory chequering as it was quite sharp and grippy and a good hold. So after sanding the rest of it I used some Nitromors just on the chequering and a stiff nylon brush just to clear out most of the varnish, which actually darkened those areas which was quite nice as it made the stock look a little more interesting. The grain of the wood was actually quite pleasant and with having the 'custom' stock thankfully no filler!
Next job colouring the wood, I didnt want to go too dark and I found the remnants of some water based Dark Oak woodstain in the cupboard, not enough to do the whole stock, so I diluted it 50/50 with some water and applied it to the bare stock. First coat soaked straight in and I was worried that I wouldn't have enough stain to cover the stock nicely but I did just manage to cover it with a couple of coats. 20241012_130419.webp
Now to make it waterproof, back to the cupboard, Danish oil! Not everyone's preferred oil on an expensive stock, but fine for this little project. 3 coats of Danish oil applied, hanging it outside on the washing line to dry in between coats as it was a glorious hot sunny day. So I'd ended up with a nice satin finish to the stock which was perfectly presentable. Then I remembered I'd seen a bit of Slipperydicks finishing oil left in a bottle when I was looking for the woodstain. Right, 5 or 6 coats of that applied over the course of the week, and it's brought the shine up nicely and made the stock nice and waterproof, (not that I ever go out and shoot in the rain!)

While waiting for the various coats of oil to dry I also found a sheet of white styrene in my modelling drawer and made myself a little butt pad spacer.

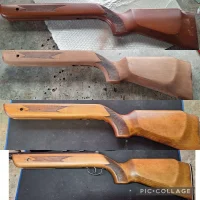
So here's a picture of start to finish.Collage_2024-10-14_21_13_29.webp
Quite pleased with how it came out, but there was just one more thing annoying me, the front stock screws. They'd been in and out quite a few times over the project, and the cheap chinesium metal was looking a little sorry for itself. The screws are a particular head pattern to China I believe as neither a Phillips or a posidrive screwdriver ever fit them properly. Quick perusal on ebay and found some replacement items and some brass screw cups because we'll why not. I know she's not exactly a Prosport, but she's worth it!20241026_173139.webp
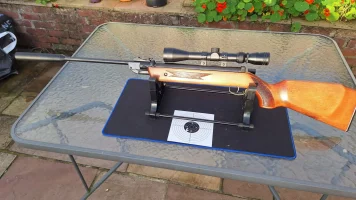
So here's the final picture (for now) of my B2's journey. (Minus the stock screws and brass cups because I've only just fitted them)20241017_172220.webp
Summing up, for the sake of a few quid, some left over materials and some spare time I think I've actually built myself (with a little help along the way from Hal!) a rather unique little springer. It doesn't look half bad, and shoots lovely, hopefully bedding in a little more with use. She's small and light enough for my daughter to use, and I certainly wouldn't be embarrassed to take it out of a gunslip at the range.

Was it really worth it? I think there's a perfectly good phrase to sum up this project, 'A Gentlemans Folly', yep, she's definitely that.

Happy shooting!
 
Last edited:
Back
Top