• the Daily hi thread just say hi :)
  • Welcome to the UK's Most Active Airgun Forum

    Looking for expert advice on air rifles and shooting gear? You have found the internet's premier independent airgun forum. Our active shooting community shares daily technical insights on modular PCP air rifles, spring-powered rifles, air pistols, pellet testing, and optics setup. Whether you are troubleshooting an FX or Daystate regulator, discussing legal FAC requirements, planning a night vision hunting trip, or looking for pest control tips, our members are here to help.

Falcon FN12 firing valve adjustment/spring/replacement

trif55

Active member
Joined
Oct 8, 2023
Messages
38
Reaction score
58
Points
78
Location
England
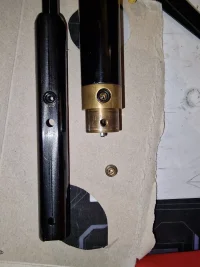
So I'm trying to restore an abused Falcon FN12, I got it totally apart after this pic, cleaned it all, new seals, back together lovely. however power still an issue, I assume this spring and valve are the issue because I've cranked all the hammer side to the max and still only see 4 joules or so, can't even stick a pellet into a bit of pine board!
653706578_10161999234186736_5522326996359127062_n.webp652898095_10161999234161736_8565342489423228410_n.webp

It took some serious abuse to get it apart (mole grips) and I then noticed the spring was slightly bent due to how it sat on the o-ring with the metal washer under the o-ring (I assume these are meant to be in the other order, metal washer against spring?) anyway the bigger issue was the bend had nearly broken (or had already broken and been glued) the plastic spring guide on the firing pin. It seeeeeeemed ok assembled anyway and held air (with a bit of re-lapping) and let air out when hit firmly. However now i've got it to pressure and assembled and tested it, it's not working right at all.

I left that o-ring out anyway and just put the washer back, I was wondering about options for spring guides or other things, and also if that spring looks like the original spring? (looks quite heavy to me!) I Don't see anyone selling replacement firing valves and I've tried glue but that plastic doesn't seem very glue-able....

Thanks,
 
I can whip you up a firing valve on my lathe no problem.
Made one for my PP750 because that broke from dry-firing it,and general brittleness
I would need to have the original valve or a good drawing of the one you have now?
Most important part is the hole diameter of the metal pin and the radius on it (but you could lap that)

Maybe i've got one in my spares, but I think the one I have as a spare is from the later Prairie, the one Falcon made before AA took over.
The original spring is very stout, this one could very well be original.
The o-ring on the valve stem seems strange, I don't remember that from my FN12's and FN8, I don't see the need for one, as you are depending on the nylon valve head to seal the air, and when opening the valve the oring seems to be an upstruction for air flow past the valve stem.

What hammer spring is fitted and how much preload is on it, because I think you are looking at the wrong end of the air supply here.
I.e. the hammer spring is probably the wrong one, how easy was it to cock, my fn12 single shot was quite hard to cock.

Does the hammer slide freely, as I've seen them sticking when lubricated with grease that hardened.
Adjusting the trigger to light can also have an effect as it scrapes on the hammer, and thus slows it down.
 
Last edited:
After taking apart my FN pistol there is indeed a rubber ring there, on mine it's near the valve head side, and indeed the steel ring was under it in mine (but I am willing to bet I assembled it wrong, it would make more sense to put it under the steel ring. The valve spring then rests on the metal ring, and the rubber ring is then sandwiched between the steel ring and the brass valve body. It will probably compress a bit there, and act as a guide for the valve stem, preventing the steel stem making contact with the brass housing.
 
Last edited:
So I'm trying to restore an abused Falcon FN12, I got it totally apart after this pic, cleaned it all, new seals, back together lovely. however power still an issue, I assume this spring and valve are the issue because I've cranked all the hammer side to the max and still only see 4 joules or so, can't even stick a pellet into a bit of pine board!

View attachment 951855View attachment 951856

It took some serious abuse to get it apart (mole grips) and I then noticed the spring was slightly bent due to how it sat on the o-ring with the metal washer under the o-ring (I assume these are meant to be in the other order, metal washer against spring?) anyway the bigger issue was the bend had nearly broken (or had already broken and been glued) the plastic spring guide on the firing pin. It seeeeeeemed ok assembled anyway and held air (with a bit of re-lapping) and let air out when hit firmly. However now i've got it to pressure and assembled and tested it, it's not working right at all.

I left that o-ring out anyway and just put the washer back, I was wondering about options for spring guides or other things, and also if that spring looks like the original spring? (looks quite heavy to me!) I Don't see anyone selling replacement firing valves and I've tried glue but that plastic doesn't seem very glue-able....

Thanks,
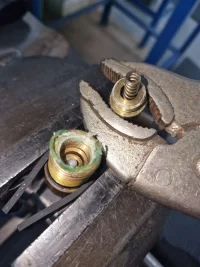
The photo is not the best but the exhaust valve looks to be badly deformed. This is usually caused by over pressurising. It needs replacing. Its dimensions are critical for the rifle to work correctly.
 
My valve body looks the same, and it shoots perfectly.
As long as the stem is straight and the head has a small 45 degree chamfer I think it is ok.
The hole in which the plastic sits is quite a bit larger then the plastic/nylon valve body so to give problems there it would have to be at least a mm or so oversize, and there's no way you can deform the head that much with anything near the max working pressure of this gun.
 
The o ring and hardened steel washer are to stop the spring from cutting into the brass cap and creating swarf getting under the valve, but believe me if you remove them it will make the performance much worse, the valve head looks slightly bulged on the od, the valve should be 217 thous in diameter i’ve seen swollen ones measure 220 thous in diameter and the performance drops considerably, the valve head is screwed onto the shaft and can be replaced, i do have some original valve heads made from peek if needed. or the original one can also be recut in a lathe back to factory dimensions.
 
I can whip you up a firing valve on my lathe no problem.
Made one for my PP750 because that broke from dry-firing it,and general brittleness
I would need to have the original valve or a good drawing of the one you have now?
Most important part is the hole diameter of the metal pin and the radius on it (but you could lap that)

Maybe i've got one in my spares, but I think the one I have as a spare is from the later Prairie, the one Falcon made before AA took over.
The original spring is very stout, this one could very well be original.
The o-ring on the valve stem seems strange, I don't remember that from my FN12's and FN8, I don't see the need for one, as you are depending on the nylon valve head to seal the air, and when opening the valve the oring seems to be an upstruction for air flow past the valve stem.

What hammer spring is fitted and how much preload is on it, because I think you are looking at the wrong end of the air supply here.
I.e. the hammer spring is probably the wrong one, how easy was it to cock, my fn12 single shot was quite hard to cock.

Does the hammer slide freely, as I've seen them sticking when lubricated with grease that hardened.
Adjusting the trigger to light can also have an effect as it scrapes on the hammer, and thus slows it down.
I have an FN19 as well and I've swapped hammer springs around and stuff, the FN19 works with either hammer spring barely pre-loaded and the FN19 hammer shows a bit of rust. Whereas as the FN12 that's the problem is freshly oiled and feels/slides much more smoothly but just can't get the air out with any amount of hammer spring preload.

Thanks for all the replies that the valve spring, good to know that though heavy, it is the correct one.

Sorry the o-ring pictured sits behind the valve spring in empty space, as someone else describes it seems to sit under the washer the valve spring presses against just for? some reason...

However, o-rings are an interesting place to start because in this older model falcon there's a "blowby" o-ring that the valve stem goes through that's apparently to prevent air escaping the chamber towards the hammer. I wonder if the brass clamp on this is a little tight and it's giving too much resistance from the o-ring against the valve stem. seems unlikely as I put a little silicone grease in there and the hammer is quite forceful. but otherwise I can't think what else it would be
 
The o ring and hardened steel washer are to stop the spring from cutting into the brass cap and creating swarf getting under the valve, but believe me if you remove them it will make the performance much worse, the valve head looks slightly bulged on the od, the valve should be 217 thous in diameter i’ve seen swollen ones measure 220 thous in diameter and the performance drops considerably, the valve head is screwed onto the shaft and can be replaced, i do have some original valve heads made from peek if needed. or the original one can also be recut in a lathe back to factory dimensions.
thanks, I'll replace that o-ring, to confirm, o-ring under steel washer or between washer and spring? and I'll adjust the blowby o-ring at the same time as well as take some measurements and better pics of the valve etc
 
Strange problem then.
Could you swap the fn19 valve blcok over to the fn12??
If it fires ok then there is something wrong with the vlave block, but if it is way down on power with the fn19 valve block in the fn12 then something downstream of the valve block is wrong.
Maybe the brass transfer tube between valve and barrel is not sealed, or blocked, or just to small (as I read back you never had this gun firing good??)
Does the barrel transfer port line up with the brass transfer port??
 
Strange problem then.
Could you swap the fn19 valve blcok over to the fn12??
If it fires ok then there is something wrong with the vlave block, but if it is way down on power with the fn19 valve block in the fn12 then something downstream of the valve block is wrong.
Maybe the brass transfer tube between valve and barrel is not sealed, or blocked, or just to small (as I read back you never had this gun firing good??)
Does the barrel transfer port line up with the brass transfer port??
I've not done a seal kit on the FN19 and it currently works so I'm somewhat lothe to fully strip it down, though when I saw how rusty the hammer looked I was tempted. Both are 2nd hand to me, the FN19 always worked a dream, though had it's Blueing stripped and is a bit rusty in parts and the stock has been massacred.... the FN12 never fired when I got it, I assume over-pressured or damaged valve them, I had to de-pressurise it by tapping the valve "manually" :-(
 
Another thing to check is the o ring gland at the back of the block which stops air escaping from around the valve shaft you will need a tool with notch cut into it to remove the gland cap also it’s thread locked in so a bit of heat may be required to remove it.
 
As an aside, how on earth is the o-ring on the bolt retaining pin meant to survive? it's totally chewed up already!

Another thing to check is the o ring gland at the back of the block which stops air escaping from around the valve shaft you will need a tool with notch cut into it to remove the gland cap also it’s thread locked in so a bit of heat may be required to remove it.
This was what I meant here, you can loosen it with a normal screwdriver if you disassemble the valve body first to remove the stem
However, o-rings are an interesting place to start because in this older model falcon there's a "blowby" o-ring that the valve stem goes through that's apparently to prevent air escaping the chamber towards the hammer. I wonder if the brass clamp on this is a little tight and it's giving too much resistance from the o-ring against the valve stem.
 
Pic update: so the transfer port looks good and was well clamped down exactly on target, with even pressure marks on the o-rings (I did discover tapping the valve to let the air out will fire the o-ring out at you very forcefully!)
20260406_164705.webp

Valve body and bits all look ok, in this gun it looks like the contact patch is the side of the plastic valve body? in a slightly tapered brass outer? rather than the "tip?" I can see the shiny brass area where the valve presses, the plastic measures 5.56mm exactly and was a good air-tight fit when assembled
20260406_215354c.webp

20260406_165728.webp20260406_165733.webp

the issue is the spring retaining nub is missing and I don't know what impact that spring being off centre would have? I suppose I could check and maybe reduce the spring force a little more by making a new nub by removing some more of the plastic material actually, I may give that a try!
 
Another thing to check is the o ring gland at the back of the block which stops air escaping from around the valve shaft you will need a tool with notch cut into it to remove the gland cap also it’s thread locked in so a bit of heat may be required to remove it.

The way to do it. Remove the valve stem will allow you to undo the collar screw with the right size screwdriver, in reverse, with a new o-ring in place start the collar screw in its thread, if you’ve put a little silica grease on the o-ring, re introduce the valve stem through the o-ring but not so far you can’t still get the screwdriver on the collar to screw it down, not all the way tight as your purposely deforming the o-ring to make a good seal but don’t want to stop the stem moving with the spring pressure 👍
 
Pic update: so the transfer port looks good and was well clamped down exactly on target, with even pressure marks on the o-rings (I did discover tapping the valve to let the air out will fire the o-ring out at you very forcefully!)
View attachment 952159

Valve body and bits all look ok, in this gun it looks like the contact patch is the side of the plastic valve body? in a slightly tapered brass outer? rather than the "tip?" I can see the shiny brass area where the valve presses, the plastic measures 5.56mm exactly and was a good air-tight fit when assembled
View attachment 952164

View attachment 952165View attachment 952166

the issue is the spring retaining nub is missing and I don't know what impact that spring being off centre would have? I suppose I could check and maybe reduce the spring force a little more by making a new nub by removing some more of the plastic material actually, I may give that a try!
Thats a better photo. As well as part broken off that would position the return spring the valve head is quite clearly deformed through over pressurising. It can be seen that where the sealing surface was has been forced into the valve body outlet port restricting flow.. Get a new exhaust valve or one that hasn't been damaged through misuse fitted and all will be well. You are wasting your time until you replace it.
 
where's a good place to get one? or could this one just be re-finished? I see what you mean now with that "lip" on what should be a smooth 45 degree angle, I guess those lips restrict the airflow?
 
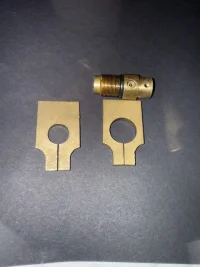
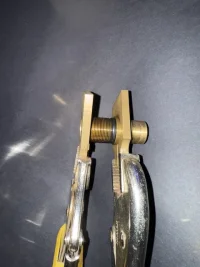
Not to moan, but I hate to see mole grips used on the brass valve parts, you can cut a piece of copper plumbing pipe or aluminium to go in between the grips or the parts. Others have modified a spare Titan/ Falcon air cylinder band, others have their own methods and tools 👍IMG_4077.webpIMG_4078.webpIMG_4079.webp
 
Back
Top