• the Daily hi thread just say hi :)
  • Welcome to the UK's Most Active Airgun Forum

    Looking for expert advice on air rifles and shooting gear? You have found the internet's premier independent airgun forum. Our active shooting community shares daily technical insights on modular PCP air rifles, spring-powered rifles, air pistols, pellet testing, and optics setup. Whether you are troubleshooting an FX or Daystate regulator, discussing legal FAC requirements, planning a night vision hunting trip, or looking for pest control tips, our members are here to help.

BSA Airsporter Mk 1 gentle refurb

GMballistic

Busy member
Joined
Jun 14, 2026
Messages
437
Reaction score
1,465
Points
108
Location
South Wales
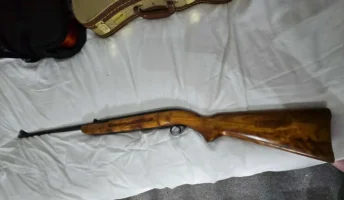
Just recently got a BSA Airsporter Mk1 (1948-1954) in a swap for a pistol I was selling. I love vintage and antique guns so it was an easy decision for me.

As I got it.
00 G12477 serial n#.webp

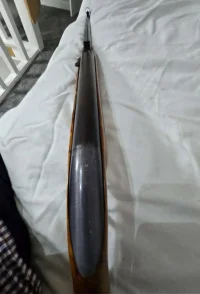
Well used and worn through the paint in places on the trigger block/guard.
04.webp

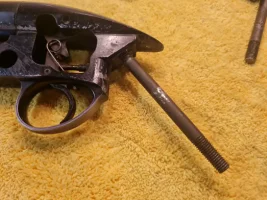
I hadn't intended to do anything to the rifle but unfortunately when it arrived the stock retaining bolt had snapped during transit through no fault of the seller/swapper as it was well packed from what I could see.
07 Arrived damaged.webp

At that point I decided I'd do a "mini" refurb on it as for starters I was going to have to get that out before I could put the rifle together so thought I'd spend a little time making it my own.

First job get the remaining part of the old bolt out whilst I waited for the new/old stock one to arrive from John Knibbs.
Of course it wouldn't come out easily, even with heat, mole grips, cutting a slot for a screw driver etc so in the end I had to drill it out and look at re-tapping the hole.

Not knowing the size was difficult and being an old BSA the size was imperial but some random old, seldom used motor bike size from what I could gather. 🤔 😆
I ended up using an "F" drill bit I had and a 5/16th x 18 TPI UNC tap. The tap was/is not the correct TPI I'm sure so the pitch was off but luckily it was close enough to work.
09 Drilled out & retapped hole.webp10 Stock bolt refitted.webp

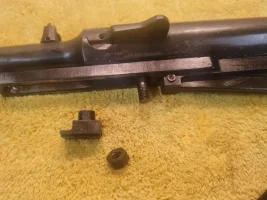
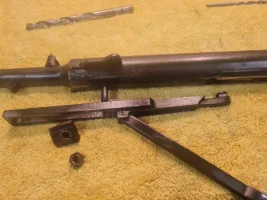
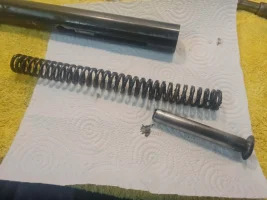
With that sorted I started stripping down the rifle internals to check for any damage to the seal or spring in the chamber.
12 Dis-assembly.webp

14.webp

15 Cocking arm lever assembly.webp

Spring seemed in good shape as did the guide and all original too.
18.webp

The leather seal on the piston was crumbling a little on the edges with one side pretty bad so I decided to replace it with a modern alternative from TW Chambers.
19 Piston with original leather seal.webp

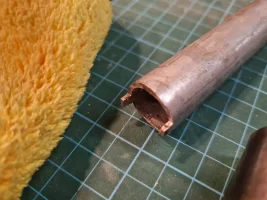
The piston I could see would dismantle for seal replacement but I wasn't 100% how to do it and was sure a special tool was needed so I asked on here and thankfully @Johnbaz was able to tell me how it was done.
I just needed to make a special tool from some pipe and thankfully I had just the pipe needed already in my garage so it was a simple DIY with my grinder and a handfile.
21 Tool made to dis-assemble piston.webp

22 Dismantled piston assembly.webp

New seal and O-ring all fitted ready for assembly later on.
24 Piston reassembled with modern seals.webp

With the gun apart I decided to have a go at the underlever which was very heavily rust pitted.
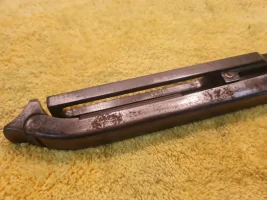
25 Rust pitting on lever arm.webp

I quickly realized that the pitting was very deep as well as the lever being hardended making removing the pitting even more difficult.
26 Removing rust pitting.webp

I perservered swapping to a Dremel grinding wheel, then hand files followed by various grades of sand paper. Nowhere near perfect but I didn't want to make the lever uneven or weaken the overall structure so I left it at that.


29.webp

Then I tried using some Abbey bluing gel.
Warmed the lever arm a little bit first then applied the gel, washing off after a few seconds and repeating the process 5 or 6 times before oiling. Time will tell how long it will last but looks good for now.
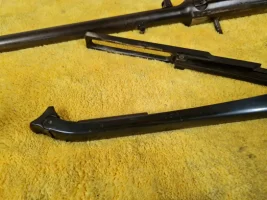
30 Abbey cold bluing.webp

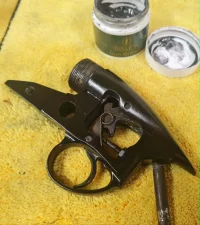
Next up; the trigger block refurb.
I used all Halfords paints for this ~ Etch primer first, then satin black followed by clear lacquer afterwards to protect the finish.
31 Paints for trigger block refurb.webp

First job was to strip some bits out of the block, prep the block using sand paper for better adhesion, mask off and then degrease ready for the etch primer.
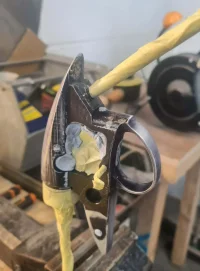
32 Prepped trigger block.webp

33 Etched primed.webp

Left to dry for 24 hours then, quick check over for any contaminates, then painted in satin black base colour.
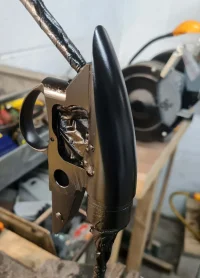
34 Satin black paint.webp

Again left to dry for 24 hours before checking over and applying the clear lacquer.
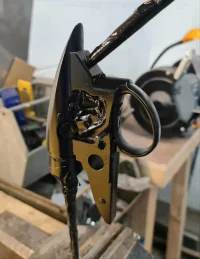
35 Clear lacquered.webp

Once dryed I reassembled.
36 Trigger block reassembled.webp

More to follow.
 
Last edited:
With the metal work already next up was the stock.
37 Original stock finish.webp

Some of the type of marks I wanted to get rid of.
39.webp

It has had a repair at somepoint in its life but thankfully it seems to be a good solid repair, ...I did think about hiding the repair with my wood filler, then staining it but tbh I feel that it would not be right to hide it as to me it adds some character.
I would however fill some of it so that the rifle felt smooth to the touch by the repair.
40.webp

I started by using Nitromors to remove the old finish. A somewhat slow and messy process.
41 Nitromors removing the finish.webp

After several applications it was starting to get there.
42.webp

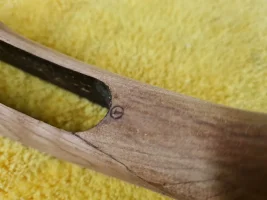
Also uncovered a strange "T" marking on the stock. No idea what that was done for so if anyone knows please leave a comment.
43 Marking on stock.webp

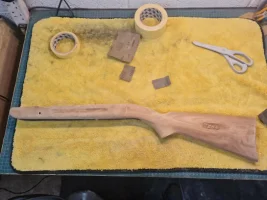
I then filled and repaired any imperfections I felt that were unsightly. I didn't want to go too far with the repairs though as I am not trying to make the rifle look brand new more so good condition for it's age.
44 Scratches sanded out & filled.webp

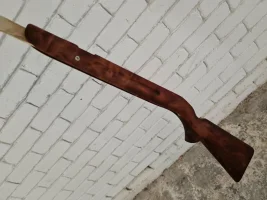
I then stained it with a 50:50 mix of Birchwood Casey walnut stain as I felt it would look good being a darker colour.
45 Walnut wood stain.webp

Next up was the Birchwood Casey "Tru Oil" process which I have done on several rifles over the decades.
Basic process is;
  1. Make sure all the Nitro Mors stripper is gone by degreasing with white spirit or similar. Allow to fully dry.
    Then use a tak cloth before hand applying Tru oil to the stock from top to bottom whilst it is hanging up. The first coat will leach into the dry wood a lot but do not get carried away trying to apply too much oil. Leave for 12-24hrs to dry.

  2. Once dry, use fine wire wool to remove any imperfections or runs. Then tak cloth and hand apply another coat of Tru oil in the same manner as step 1. Leave for 12-24hrs to dry.

  3. Repeat step 2 but this time replace the wire wool for some wet & dry 800 grit sandpaper with plenty of soapy water (try not to rub through the layers of tru oil already applied). After gently sanding any imperfections or runs out make sure the stock is dry, tak cloth and apply another coat of Tru oil. Leave for 12-24hrs to dry.

  4. Repeat step 3 but this time replace the wet & dry 800 grit sandpaper for 1000 grit with plenty of soapy water. Repeat step 3 process. Repeat the steps above as many times as deemed necessary (I gave this stock 7 coats of Tru oil).

  5. Final coat ~ apply Tru oil sparingly and as streak free as possible. Leave for 12-24hrs to dry and fully cure. Then apply silicone gun oil to stock once dry.

    46 After 7 coats of Tru Oil.webp
47.webp


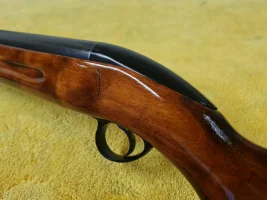
With the wood work and metal work all finished I was itching to get the rifle back together to see the finished result.
49 All back together.webp

50.webp

52.webp

Finally got to shoot it. 😁
This was the first five RWS Hobby pellets I shot from the rifle standing at 6 yards. Will need some tweaking to zero as well as some pellet testing but more than happy with that for a 70+ year old airgun & open sights.
53 Test firing.webp

Thanks for reading. 👍
 
I don't suppose you've chronoed it since the rebuild with that piston seal conversion ?


.
 
I don't suppose you've chronoed it since the rebuild with that piston seal conversion ?
I haven't no but do plan on doing so.

I want to do some shooting first and get it bedded in a little before trying it over the chronograph to see what it's doing. I was told it was doing 10.1-10.3 ft/lbs with Marksman pellets before I had it so will be interesting to see what it comes out with.
Doesn't need to be high powered though for what I am using it for. 👍
 
With the metal work already next up was the stock.
View attachment 1013715

Some of the type of marks I wanted to get rid of.
View attachment 1013716

It has had a repair at somepoint in its life but thankfully it seems to be a good solid repair, ...I did think about hiding the repair with my wood filler, then staining it but tbh I feel that it would not be right to hide it as to me it adds some character.
I would however fill some of it so that the rifle felt smooth to the touch by the repair.
View attachment 1013718

I started by using Nitromors to remove the old finish. A somewhat slow and messy process.
View attachment 1013720

After several applications it was starting to get there.
View attachment 1013721

Also uncovered a strange "T" marking on the stock. No idea what that was done for so if anyone knows please leave a comment.
View attachment 1013722

I then filled and repaired any imperfections I felt that were unsightly. I didn't want to go too far with the repairs though as I am not trying to make the rifle look brand new more so good condition for it's age.
View attachment 1013725

I then stained it with a 50:50 mix of Birchwood Casey walnut stain as I felt it would look good being a darker colour.
View attachment 1013726

Next up was the Birchwood Casey "Tru Oil" process which I have done on several rifles over the decades.
Basic process is;
  1. Make sure all the Nitro Mors stripper is gone by degreasing with white spirit or similar. Allow to fully dry.
    Then use a tak cloth before hand applying Tru oil to the stock from top to bottom whilst it is hanging up. The first coat will leach into the dry wood a lot but do not get carried away trying to apply too much oil. Leave for 12-24hrs to dry.

  2. Once dry, use fine wire wool to remove any imperfections or runs. Then tak cloth and hand apply another coat of Tru oil in the same manner as step 1. Leave for 12-24hrs to dry.

  3. Repeat step 2 but this time replace the wire wool for some wet & dry 800 grit sandpaper with plenty of soapy water (try not to rub through the layers of tru oil already applied). After gently sanding any imperfections or runs out make sure the stock is dry, tak cloth and apply another coat of Tru oil. Leave for 12-24hrs to dry.

  4. Repeat step 3 but this time replace the wet & dry 800 grit sandpaper for 1000 grit with plenty of soapy water. Repeat step 3 process. Repeat the steps above as many times as deemed necessary (I gave this stock 7 coats of Tru oil).

  5. Final coat ~ apply Tru oil sparingly and as streak free as possible. Leave for 12-24hrs to dry and fully cure. Then apply silicone gun oil to stock once dry.

    View attachment 1013734
View attachment 1013735


With the wood work and metal work all finished I was itching to get the rifle back together to see the finished result.
View attachment 1013736

View attachment 1013738

View attachment 1013740

Finally got to shoot it. 😁
This was the first five RWS Hobby pellets I shot from the rifle standing at 6 yards. Will need some tweaking to zero as well as some pellet testing but more than happy with that for a 70+ year old airgun & open sights.
View attachment 1013741

Thanks for reading. 👍
👏👏👏 Nicely done, sir. Pretty rifle.👍👍🙂
 
I haven't no but do plan on doing so.

I want to do some shooting first and get it bedded in a little before trying it over the chronograph to see what it's doing. I was told it was doing 10.1-10.3 ft/lbs with Marksman pellets before I had it so will be interesting to see what it comes out with.
Doesn't need to be high powered though for what I am using it for. 👍

TBH That was pretty good for an early Airsporter, my .22 MK3 ( pointy piston) is barely doing 9 ft ft/lbs with a new leather seal and WW kit with a longer than standard ( for a .22 Airsporter) WW spring.

I'm thinking that the leather seal isn't that good that I fitted, it's not very dense leather.
 
👏👏👏 Nicely done, sir. Pretty rifle.👍👍🙂
Thank you appreciate it.
I'm really pleased with it too. Shot really nicely. :love:

TBH That was pretty good for an early Airsporter, my .22 MK3 ( pointy piston) is barely doing 9 ft ft/lbs with a new leather seal and WW kit with a longer than standard ( for a .22 Airsporter) WW spring.

I'm thinking that the leather seal isn't that good that I fitted, it's not very dense leather.
I'd rather it had a nice shot cycle than all out power ~ if I had to guess I'd say mine is shooting around 9-10 ft/lbs max. We will see soon.
 
Great job on the refurb - I have a few early Airsporters- all around the 9 - 9.5 Ftlbs mark
Thank you.
This is my first Airsporter and I'd be happy if it's doing that sort of power. I thought the trigger might be a bit poor when I was just looking at how it works before getting to shoot it but I was pleasantly surprised. It really is a nice rifle to shoot.
 
With the metal work already next up was the stock.
View attachment 1013715

Some of the type of marks I wanted to get rid of.
View attachment 1013716

It has had a repair at somepoint in its life but thankfully it seems to be a good solid repair, ...I did think about hiding the repair with my wood filler, then staining it but tbh I feel that it would not be right to hide it as to me it adds some character.
I would however fill some of it so that the rifle felt smooth to the touch by the repair.
View attachment 1013718

I started by using Nitromors to remove the old finish. A somewhat slow and messy process.
View attachment 1013720

After several applications it was starting to get there.
View attachment 1013721

Also uncovered a strange "T" marking on the stock. No idea what that was done for so if anyone knows please leave a comment.
View attachment 1013722

I then filled and repaired any imperfections I felt that were unsightly. I didn't want to go too far with the repairs though as I am not trying to make the rifle look brand new more so good condition for it's age.
View attachment 1013725

I then stained it with a 50:50 mix of Birchwood Casey walnut stain as I felt it would look good being a darker colour.
View attachment 1013726

Next up was the Birchwood Casey "Tru Oil" process which I have done on several rifles over the decades.
Basic process is;
  1. Make sure all the Nitro Mors stripper is gone by degreasing with white spirit or similar. Allow to fully dry.
    Then use a tak cloth before hand applying Tru oil to the stock from top to bottom whilst it is hanging up. The first coat will leach into the dry wood a lot but do not get carried away trying to apply too much oil. Leave for 12-24hrs to dry.

  2. Once dry, use fine wire wool to remove any imperfections or runs. Then tak cloth and hand apply another coat of Tru oil in the same manner as step 1. Leave for 12-24hrs to dry.

  3. Repeat step 2 but this time replace the wire wool for some wet & dry 800 grit sandpaper with plenty of soapy water (try not to rub through the layers of tru oil already applied). After gently sanding any imperfections or runs out make sure the stock is dry, tak cloth and apply another coat of Tru oil. Leave for 12-24hrs to dry.

  4. Repeat step 3 but this time replace the wet & dry 800 grit sandpaper for 1000 grit with plenty of soapy water. Repeat step 3 process. Repeat the steps above as many times as deemed necessary (I gave this stock 7 coats of Tru oil).

  5. Final coat ~ apply Tru oil sparingly and as streak free as possible. Leave for 12-24hrs to dry and fully cure. Then apply silicone gun oil to stock once dry.

    View attachment 1013734
View attachment 1013735


With the wood work and metal work all finished I was itching to get the rifle back together to see the finished result.
View attachment 1013736

View attachment 1013738

View attachment 1013740

Finally got to shoot it. 😁
This was the first five RWS Hobby pellets I shot from the rifle standing at 6 yards. Will need some tweaking to zero as well as some pellet testing but more than happy with that for a 70+ year old airgun & open sights.
View attachment 1013741

Thanks for reading. 👍
Fabulous job there!! 👍😎😎
 
OOh, I have a Mk2 in bits on the bench, might have to make more effort :unsure:
Definetly get that old gun back to shooting. 😁 👍

Was smiling from ear to ear when I finally got to shoot mine and it felt great.
 
Back
Top