Relum LG527

Danthepainter

Top Tier member
Honorary
Joined
May 5, 2023
Messages
6,034
Reaction score
16,115
Location
Macclesfield
I've been working on this little rifle on and off for months now but lost some photos so I'll start where I can.
The rifle is a light cocking break- barrel in .22. It has (I think) complete open sights bar the foresight hood. It belonged to a late friend. I've neglected it for quite some time but since I have the wherewithall to 'redo' it, why not wade in?
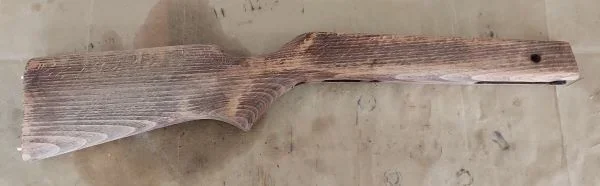
This shows the general condition externally. It's pitted and filthy with maybe 20% original finish. The stock has been sprayed with many coats of car lacquer which is hard as nails
527 in bits.jpg
Then I took it to bits because it was obviously very unwell, detonating and dieseling pretty badly. The next pictures show the riveted replacement seal and the steel rod I used to peen the new rivet with a nine mil punch. I had to buy a new hammer because my 16 oz joiner's hammer wasn't working. A 32 oz ball pein did though.
relum ps.jpg
peening rod.jpg
Piston peened.jpg
527 piston seal.jpg

Here's a few others including the start of polishing. I know this is a bit backwards me showing the cosmetics first but that's because I have already done most of the technical bits with different spring set ups but lost the photos. I'll redo all that after the refinish. I have happily stumbled upon using a Webley Xocet spring, guide and a third party tophat/ slip washers.
I'll cover more of that when I've got photos and chrono figures.
527 sight L.jpg
527 sight top.jpg
Polishing, so much polishimg.jpg
 
I know it’s not the point of your thread Dan but I’ve got to say what a blinding idea of using the decorative wood moulding in the vice to hold the cylinder….. why have I never thought of that 🤔 now ask me what’s hanging up in the shed roof directly above the vice 😣 and I’ve still never put two and two together. Great project by the way 😎👍
 
I know it’s not the point of your thread Dan but I’ve got to say what a blinding idea of using the decorative wood moulding in the vice to hold the cylinder….. why have I never thought of that 🤔 now ask me what’s hanging up in the shed roof directly above the vice 😣 and I’ve still never put two and two together. Great project by the way 😎👍
It only took me thirty years for the penny to drop as well so I can't claim much of a breakthrough either. Homer face palm It stemmed from me being too tight to fork out for magnetic soft jaws. I epoxyed ply to the reverse so they don't split under pressure.
 
It only took me thirty years for the penny to drop as well so I can't claim much of a breakthrough either. Homer face palm It stemmed from me being too tight to fork out for magnetic soft jaws. I epoxyed ply to the reverse so they don't split under pressure.
I’m glad it’s not just me then Dan 😉 I am going to unashamedly pinch your idea and do exactly the same if you don’t mind 😎👍
 
I’m glad it’s not just me then Dan 😉 I am going to unashamedly pinch your idea and do exactly the same if you don’t mind 😎👍
Be my guest mate. I also toyed with the idea of lining them with old innertube for much better grip.
 
  • Like
Reactions: PJB
Innards.
Originally I was going to go with the standard double counter wound springs from the TWC kit. After putting the new seal on the piston I cleaned and deburred it inside and around the cocking slot. Pic.1
After that I reassembled and tested. It was awful. The springs were fighting each other inside and the whole firing cycle was very rough. The received wisdom is to replace the double setup with a Meteor mainspring. As I was pondering this I noticed the old innards of my Webley Xocet in the drawer. They looked like they'd fit and sure enough they do very nicely. Pic.2
As you can see, the Xocet spring is below the double and has a factory rear guide but the tophat looks third party. I already had slip washers knocking around. This time firing was greatly improved. Smooth to cock and only a hint of buzz. The Xocet arrangement has .25mil thicker wire for the same o/d and reduces preload by 7mm.
That was as far as I got before I decided to go all in and restore it.
More to follow.
 

Attachments

  • Slot.webp
    Slot.webp
    162.6 KB · Views: 32
  • 527 Springs.webp
    527 Springs.webp
    61.5 KB · Views: 36
Nice write up Dan and the bluing looks fine. Next time you should try slow fume blu, it give a very nice dark grey when done but once oiled it goes a lovely black colour. You just need brick acid, a few small pots, a big lidded box and a fish kettle to boil and clean the parts.........dom
 
On to the stock.
Pictures 1- 4 show where I started. Dave's dad was a car body man and apparently he lacquered it in the 80s. Many times by the looks of it. He also attached a BSA rubber buttpad to lengthen the pull. Good idea but looked wrong and had perished anyway leaving three holes.
P. 5A & 5b stock stripped.
P. 6 drilled out the old holes to 4.5mm to get rid of surrounding staining.
P.7 I didn't have any small enough dowel so I put an old artist's paintbrush in a drill chuck and sanded to fit. When dry I'll use a little Japanese flush cut saw to trim them.
Next is to steam out as many dents as possible and get some finish on it.
 

Attachments

  • Stock 1.webp
    Stock 1.webp
    32.4 KB · Views: 31
  • Stock 2.webp
    Stock 2.webp
    55.6 KB · Views: 44
  • Stock 3.webp
    Stock 3.webp
    18.9 KB · Views: 36
  • Stock 4.webp
    Stock 4.webp
    80.4 KB · Views: 25
  • Stock 5a.webp
    Stock 5a.webp
    15.6 KB · Views: 26
  • Stock 5b.webp
    Stock 5b.webp
    13.6 KB · Views: 28
  • Stock 6.webp
    Stock 6.webp
    36 KB · Views: 24
  • Stock 7.webp
    Stock 7.webp
    144.8 KB · Views: 24
Putting it back together.
1: Holes plugged and will be almost invisible as more oil goes on.
2: The trigger guard and bolt heads weren't too bad so I polished them up a bit and then heated them and quenched them with 3 in 1 until they looked smarter.
3: The main parts.
4 & 5 Back together.
I think it's good looker in a very 70s way. It behaves exactly how you'd expect a mild mannered, mid size break barrel to.
The Xocet bits certainly make it smoother and more pleasant to shoot when compared with the double spring setup. It doesn't diesel (much) now and all the horrible metal to metal grauchiness has been eliminated. Happy with that. (y)
 

Attachments

  • Stock 8.webp
    Stock 8.webp
    81.3 KB · Views: 47
  • Guard and bolts.webp
    Guard and bolts.webp
    99.4 KB · Views: 31
  • Main bits.webp
    Main bits.webp
    124.3 KB · Views: 46
  • Together 2.webp
    Together 2.webp
    57.3 KB · Views: 53
  • Together.webp
    Together.webp
    61.7 KB · Views: 37
Putting it back together.
1: Holes plugged and will be almost invisible as more oil goes on.
2: The trigger guard and bolt heads weren't too bad so I polished them up a bit and then heated them and quenched them with 3 in 1 until they looked smarter.
3: The main parts.
4 & 5 Back together.
I think it's good looker in a very 70s way. It behaves exactly how you'd expect a mild mannered, mid size break barrel to.
The Xocet bits certainly make it smoother and more pleasant to shoot when compared with the double spring setup. It doesn't diesel (much) now and all the horrible metal to metal grauchiness has been eliminated. Happy with that. (y)
Looking smart , Dan. Nice job.😊👍👍
 
That looks very nice finished, well done 👏👍

I Like the blunt angled stock fore end.

What kind of power does it put out dan?
Thanks mate. I've really enjoyed doing it. Crying shame that Dave ain't around to see it as he loved that little rifle. Difficult one to reply to Rob as power discussions are verboten here. Think HW30. (y)
 
Oh aye. Should be well mannered as you say then. Proper old skool plinker.

The stock bolts you did. Is that heating really hot like with blowtorch? And then into the oil to give a blacking effect? I hear of this and should really try it out.
 
Back
Top